TeridaxXD001-gpuser (talk | contribs) (→Wart) |
|||
| (6 intermediate revisions by 5 users not shown) | |||
| Line 1: | Line 1: | ||
{{Update|ALBW}} |
{{Update|ALBW}} |
||
| − | {{Split|Wart}} |
||
{{Boss |
{{Boss |
||
|name = Arrghus |
|name = Arrghus |
||
|image = [[File:ZIArrghus.png|150px]] |
|image = [[File:ZIArrghus.png|150px]] |
||
| + | |caption = Arrghus from ''A Link Between Worlds'' |
||
| − | |title = |
||
| − | |game = {{ |
+ | |game = {{ALttP}}<br>{{FSA}}<br>{{ALBW}} |
|other = [[The Legend of Zelda: A Link to the Past (Comic)|''A Link to the Past'' comic]] |
|other = [[The Legend of Zelda: A Link to the Past (Comic)|''A Link to the Past'' comic]] |
||
| − | |dungeon = [[Swamp Palace (A Link to the Past)|Swamp Palace]]{{ |
+ | |dungeon = [[Swamp Palace (A Link to the Past)|Swamp Palace]] {{ExpGame|ALttP}}<br>[[Palace of the Four Sword]] {{ExpGame|ALttP&FS}}<br>[[Eastern Temple]] {{ExpGame|FSA}}<br>[[Swamp Palace (A Link Between Worlds)|Swamp Palace]] {{ExpGame|ALBW}} |
|weakness = [[Hookshot]]<br>[[Sword]] |
|weakness = [[Hookshot]]<br>[[Sword]] |
||
| − | |reward = [[Heart Container]]{{ |
+ | |reward = [[Heart Container]] {{ExpGame|ALttP}}<br>[[Crystal]] {{ExpGame|ALttP|FSA}}<br>[[Four Sword#A Link to the Past|Shard of the Four Sword]] {{ExpGame|ALttP&FS}}<br>[[Oren]] {{ExpGame|ALBW}} |
}} |
}} |
||
| − | '''Arrghus''' is a recurring [[Boss]] in |
+ | '''Arrghus''' is a recurring [[Boss]] in {{LZS|Series}}. It serves as the guardian of the second [[Crystal]] in the [[Swamp Palace (A Link to the Past)|Swamp Palace]] in {{ALttP}} and the [[Eastern Temple]] in {{FSA}}. Arrghus protects the portrait of the [[Sage]] [[Oren]] in the [[Swamp Palace (A Link Between Worlds)|Swamp Palace]] in {{ALBW}}. |
==Characteristics== |
==Characteristics== |
||
| − | Arrghus is a large, one-eyed jellyfish which is surrounded by several miniature polyps named [[Arrgi]]. These Arrgi and the creature's ability to float make it invulnerable to attack. Its method of attack is to send the Arrgi swirling outwards. |
+ | Arrghus is a large, one-eyed jellyfish which is surrounded by several miniature polyps named [[Arrgi]]. These Arrgi and the creature's ability to float make it invulnerable to attack. Its method of attack is to send the Arrgi swirling outwards. Arrgi must be pulled away using the [[Hookshot]] to defeat them with the [[Sword]]. When all of the Arrgi are gone, Arrghus launches itself into the air and attempts to crash straight down upon [[Link]], then it speeds across the shallow water of the room. It will also shoot needle thin lasers at the ground, which will create huge explosions, throwing columns of water into the air. In this state, it is unprotected and can be attacked with Link's Sword or other weapons. After each hit, it attempts to crush Link from above again, or shoots more lasers at him. After its destruction in {{ALttP}}, it leaves behind a [[Heart Container]] and Link is presented with the second [[Crystal]] in which one of the [[Maiden|Seven Maidens]] is imprisoned. In {{ALBW}}, it will leave a Heart Container as well as the [[Painting|portrait]] of the [[Sage#A Link Between Worlds|Sage]] [[Oren]]. |
==Varieties== |
==Varieties== |
||
===Orange Arrghus=== |
===Orange Arrghus=== |
||
| − | [[File:Orange Arrghus.gif|left| |
+ | [[File:Orange Arrghus.gif|left|110px]] |
| ⚫ | |||
| − | + | In [[The Legend of Zelda: A Link to the Past & Four Swords|''A Link to the Past & Four Swords'']], an orange Arrghus is the guardian of the green [[Four Sword]] shard in the [[Palace of the Four Sword]]. Instead of Arggi, Arrghus is surrounded [[Bari]], which will sometimes shock Link when he pulls them away from their host. This Arrghus is also stronger, faster, and sturdier, and once the Bari are removed, it is able to both change direction while skating around, as well as summon swarms of [[Kyameron]]. |
|
| − | This Argghus reappears in {{ALBW}} as the boss of the {{c|Swamp Palace|ALBW}} |
+ | This Argghus reappears in {{ALBW}} as the boss of the {{c|Swamp Palace|ALBW}}. It is able to fire lasers which boil the water underneath Link. |
| − | {{clear}} |
||
===Stone Arrghus=== |
===Stone Arrghus=== |
||
| ⚫ | Stone Arrghus appears as the boss of [[Eastern Temple]] in {{FSA}}, with a look more similar to its {{MM}} counterpart, the [[Wart]]. To defeat this stone version of the boss, Link must use his [[Boomerang]] to pull the [[rock]]s to him and then hack them with the Sword. Once all the small rocks have been destroyed, the gigantic eye starts attacking Link. When defeated, it disintegrates and leave Link with the [[Maiden#Yellow Maiden|Yellow Maiden]]. |
||
| ⚫ | |||
| ⚫ | |||
| − | |||
| − | ===Wart=== |
||
| − | [[File:Wart.png|160px|left|Wart]] |
||
| − | Arrghus, known by its Japanese name '''Wart''', is a huge eye mini-boss that rolls around trying to hit its enemies in the [[Great Bay Temple]] and the [[Secret Shrine]] in {{MM}}. It attacks and is defeated like its previous incarnations. At the start of the battle, Wart is hovering slightly above the ground, completely surrounded by a mass of bubbles, rendering it immune to any damage. It is a time-consuming enemy. The sheer amount of bubbles on it make it a long struggle to pierce its shield, as it is constantly moving, along with Wart, which will differentiate from retreating to trying to press itself against Link in an attempt to cause damage. The bow is not a good idea at this point, as there are simply too many bubbles. Any offensive weapon is capable of removing the bubbles, although the best is the bomb, which knocks many bubbles off at once. Using the Hookshot is another way of removing the bubbles, although it is a time-consuming way. Another great way is to use deku nuts, which not only destroy many bubbles in one shot, but also damage the Wart too. The bubbles are incapable of being destroyed while on Wart, only knocked off, which makes them even more of a pain. When an opening is finally made, and Wart's eye is no longer blocked by bubbles, the bow is the way to go. However, any projectile will work. After enough shots, Wart will enter stage two, forcing its surviving bubbles off its body and begin rolling around wildly. First finishing off any bubbles, then attack Wart with the Bow. After a few more shots, Wart will be finished. |
||
| − | {{Tatl|Wart|It's a Wart. Once you've gotten rid of the spheres that shield the main body, you can attack the eye.}} |
||
==Non-canon Appearances== |
==Non-canon Appearances== |
||
{{Noncanon|start}} |
{{Noncanon|start}} |
||
| − | ===''A Link to the Past'' |
+ | ===''A Link to the Past'' Comic=== |
| − | A creature resembling Arrghus is featured in Chapter 9 of the [[The Legend of Zelda: A Link to the Past (Comic)|''A Link to the Past'' comic]]. Fought in the Swamp Palace just like in the game, the monster is shown as a bright red jellyfish that attacks with tentacles, but no eyeballs are shown. In the comic, as Link makes his way to the imprisoned |
+ | A creature resembling Arrghus is featured in Chapter 9 of the [[The Legend of Zelda: A Link to the Past (Comic)|''A Link to the Past'' comic]]. Fought in the Swamp Palace just like in the game, the monster is shown as a bright red jellyfish that attacks with tentacles, but no eyeballs are shown. In the comic, as Link makes his way to the imprisoned Maiden, a large, tentacled monster attacks him. He thrusts the [[Master Sword]] into the monster and defeats the creature, which spits out Link from inside and gives him a chance to destroy the floating Crystal where the Maiden is. |
{{Noncanon|end}} |
{{Noncanon|end}} |
||
| − | == |
+ | ==Etymology== |
| − | + | It is likely that the name "Arrghus" is a reference to {{wp|Argus Panoptes}}, an all-seeing hundred-eyed giant from Greek mythology. |
|
| + | |||
| − | *Arrghus and [[Moldorm]] are the only dungeon bosses in ''A Link Between Worlds'' that are the same species as one from ''A Link to the Past'', rather than being a variation or a different species. |
||
| + | The ''Majora's Mask'' mini-boss [[Wart]] shares Arrghus's Japanese name, {{Japanese|ワート|Wāto}}. |
||
==Gallery== |
==Gallery== |
||
<gallery> |
<gallery> |
||
| − | File:ArrghusArtwork.png| |
+ | File:ArrghusArtwork.png|Arrghus artwork from ''A Link to the Past'' |
| − | File:ArrghusALttP.png|Arrghus |
+ | File:ArrghusALttP.png|Arrghus from ''A Link to the Past'' |
| − | File:Arrghussolo.png|Arrghus without |
+ | File:Arrghussolo.png|Arrghus without Arrgi from ''A Link to the Past'' |
| − | File: |
+ | File:Wart(Arrghus)2.gif|Arrghus from ''A Link to the Past & Four Swords'' |
| − | File: |
+ | File:Arrghus (comic).png|Arrghus from the ''A Link to the Past'' comic |
| − | File: |
+ | File:Arrghus ALBW.png|Link fighting Arrghus in ''A Link Between Worlds'' |
| − | File:Arrghus (comic).png|Arrghus in the ''A Link to the Past'' comic |
||
</gallery> |
</gallery> |
||
| − | + | ==See Also== |
|
| + | * [[Barinade]] |
||
| − | <br> |
||
| + | * [[Vitreous]] |
||
| + | * [[Wart]] |
||
| + | |||
{{Names |
{{Names |
||
| − | |ja= |
+ | |ja= {{Japanese|ワート|Wāto}} |
|jaM= Wart |
|jaM= Wart |
||
| − | |es= |
+ | |es= Arrghus |
|esM= |
|esM= |
||
| − | |fr= |
+ | |fr= Meduso {{ExpGame|ALttP}} |
|frM= |
|frM= |
||
| − | |de= |
+ | |de= {{de|Arrghus|Argus}} {{ExpGame|ALttP}} |
|deM= |
|deM= |
||
|it= |
|it= |
||
| Line 70: | Line 66: | ||
|koM= }} |
|koM= }} |
||
| − | {{Bosses| |
+ | {{Bosses|ALttP}} |
{{AquaticEnemy}} |
{{AquaticEnemy}} |
||
{{EyeEnemy}} |
{{EyeEnemy}} |
||
| − | [[Category: |
+ | [[Category:Bosses in A Link Between Worlds]] |
Revision as of 00:59, 24 August 2015
It needs to be updated with information from A Link Between Worlds.
Template:Boss Arrghus is a recurring Boss in Template:LZS. It serves as the guardian of the second Crystal in the Swamp Palace in A Link to the Past and the Eastern Temple in Four Swords Adventures. Arrghus protects the portrait of the Sage Oren in the Swamp Palace in A Link Between Worlds.
Characteristics
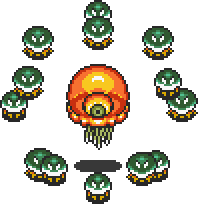
Arrghus is a large, one-eyed jellyfish which is surrounded by several miniature polyps named Arrgi. These Arrgi and the creature's ability to float make it invulnerable to attack. Its method of attack is to send the Arrgi swirling outwards. Arrgi must be pulled away using the Hookshot to defeat them with the Sword. When all of the Arrgi are gone, Arrghus launches itself into the air and attempts to crash straight down upon Link, then it speeds across the shallow water of the room. It will also shoot needle thin lasers at the ground, which will create huge explosions, throwing columns of water into the air. In this state, it is unprotected and can be attacked with Link's Sword or other weapons. After each hit, it attempts to crush Link from above again, or shoots more lasers at him. After its destruction in A Link to the Past, it leaves behind a Heart Container and Link is presented with the second Crystal in which one of the Seven Maidens is imprisoned. In A Link Between Worlds, it will leave a Heart Container as well as the portrait of the Sage Oren.
Varieties
Orange Arrghus
Stone Arrghus from Four Swords Adventures
In A Link to the Past & Four Swords, an orange Arrghus is the guardian of the green Four Sword shard in the Palace of the Four Sword. Instead of Arggi, Arrghus is surrounded Bari, which will sometimes shock Link when he pulls them away from their host. This Arrghus is also stronger, faster, and sturdier, and once the Bari are removed, it is able to both change direction while skating around, as well as summon swarms of Kyameron.
This Argghus reappears in A Link Between Worlds as the boss of the Template:C. It is able to fire lasers which boil the water underneath Link.
Stone Arrghus
Stone Arrghus appears as the boss of Eastern Temple in Four Swords Adventures, with a look more similar to its Majora's Mask counterpart, the Wart. To defeat this stone version of the boss, Link must use his Boomerang to pull the rocks to him and then hack them with the Sword. Once all the small rocks have been destroyed, the gigantic eye starts attacking Link. When defeated, it disintegrates and leave Link with the Yellow Maiden.
Non-canon Appearances
A Link to the Past Comic
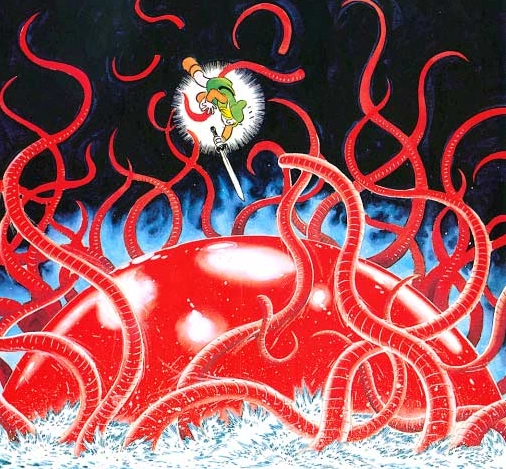
A creature resembling Arrghus is featured in Chapter 9 of the A Link to the Past comic. Fought in the Swamp Palace just like in the game, the monster is shown as a bright red jellyfish that attacks with tentacles, but no eyeballs are shown. In the comic, as Link makes his way to the imprisoned Maiden, a large, tentacled monster attacks him. He thrusts the Master Sword into the monster and defeats the creature, which spits out Link from inside and gives him a chance to destroy the floating Crystal where the Maiden is.
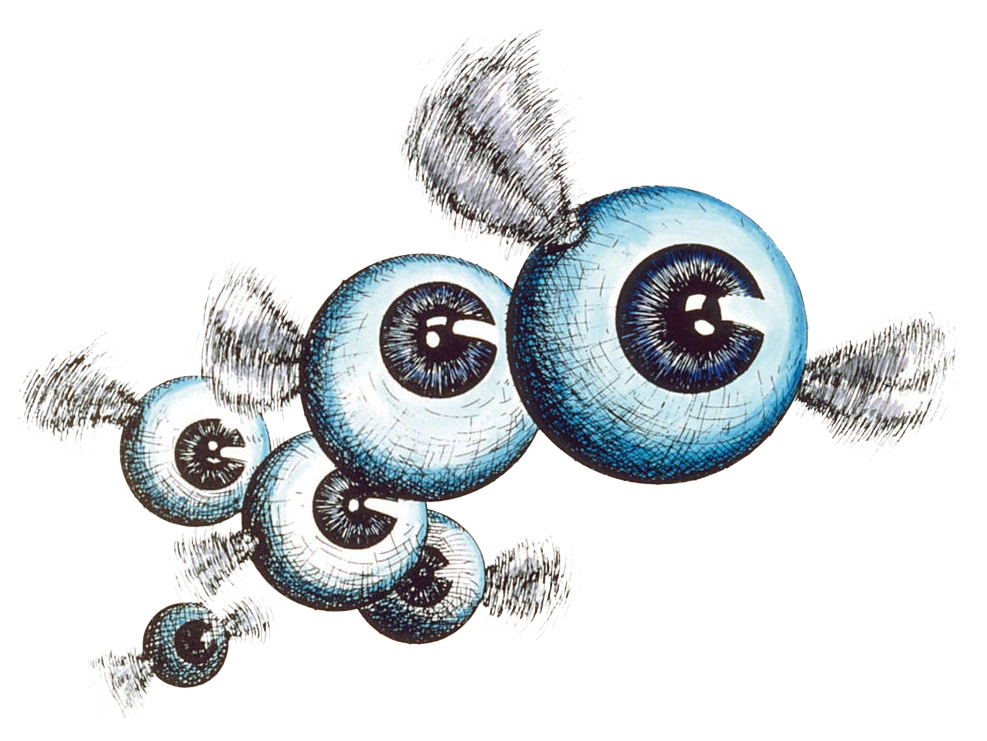
Etymology
It is likely that the name "Arrghus" is a reference to Argus Panoptes, an all-seeing hundred-eyed giant from Greek mythology.
The Majora's Mask mini-boss Wart shares Arrghus's Japanese name, Template:Japanese.
Gallery
- ArrghusArtwork.png
Arrghus artwork from A Link to the Past
- ArrghusALttP.png
Arrghus from A Link to the Past
- Arrghussolo.png
Arrghus without Arrgi from A Link to the Past

Arrghus from A Link to the Past & Four Swords

Arrghus from the A Link to the Past comic
- Arrghus ALBW.png
Link fighting Arrghus in A Link Between Worlds
See Also
| Language | Name | Meaning | |
|---|---|---|---|
| Japanese | Template:Japanese | Wart | |
| French | Meduso Template:ExpGame | ||
| German | Argus Template:ExpGame | ||
| Spanish | Arrghus | ||
Mazura · Jermafenser · Rebonack · Carock · Gooma · Barba · Thunderbird ![]() · Link's Shadow
· Link's Shadow
Light World
Ball and Chain Trooper ![]() · Six Armos Knights · Lanmola Trio · Moldorm · Agahnim
· Six Armos Knights · Lanmola Trio · Moldorm · Agahnim ![]()
Dark World
Helmasaur King · Arrghus · Mothula · Blind the Thief · Kholdstare · Vitreous · Trinexx · Ganon
Super Helmasaur · Super Arrghus · Super Mothula · Super Blind · Dark Links![]()
Bosses
Moldorm · Genie · Slime Eye · Angler Fish (2D) · Slime Eel · Facade · Evil Eagle (2D) · Hot Head · Shadow Nightmares
Guardians
Rolling Bones ![]() · King Moblin
· King Moblin ![]() · Hinox
· Hinox ![]() · Dodongo Snakes x2
· Dodongo Snakes x2 ![]() · Lanmola
· Lanmola ![]() · Cue Ball
· Cue Ball ![]() · Master Stalfos x4 · Gohma Twins · Armos Knight
· Master Stalfos x4 · Gohma Twins · Armos Knight ![]() · Smasher
· Smasher ![]() · Grim Creeper · Turtle Rock · Blaino
· Grim Creeper · Turtle Rock · Blaino
Bosses
Gohma · King Dodongo · Barinade · Phantom Ganon · Volvagia · Morpha · Bongo Bongo · Twinrova · Ganondorf · Ganon
Middle Bosses
Lizalfos · Big Octo · Stalfos · Meg · Flare Dancer · White Wolfos · Dark Link · Dead Hand · Gerudo Thief · Iron Knuckle · Dynalfos
Bosses
Odolwa · Goht · Gyorg · Twinmold · Majora ![]()
Middle Bosses
Dinolfos · Gekko · Wizzrobe · Gerudo Pirate · Wart · Gekko and Mad Jelly
Captain Keeta · Iron Knuckle · Sharp · Igos du Ikana · Garo Master · Gomess · Eyegore
Bosses
Aquamentus · Dodongo · Mothula · Gohma · Digdogger · Manhandla · Gleeok · Medusa Head · General Onox ![]()
Sub-Bosses
Brother Goriyas · Facade ![]() · Omuai · Agunima · Great Moblin
· Omuai · Agunima · Great Moblin ![]() · Syger · Vire
· Syger · Vire ![]() · Poe Sisters · Frypolar
· Poe Sisters · Frypolar
Bosses
Pumpkin Head · Head Thwomp (2D) · Shadow Hag · Eyesoar · Smog · Octogon · Possessed Nayru · Plasmarine · Ramrock · Veran ![]()
Sub-Bosses
Giant Ghini · Swoop · Subterror · Armos Warrior · Great Moblin ![]() · Smasher · Vire
· Smasher · Vire ![]() · Angler Fish (2D) · Blue Stalfos
· Angler Fish (2D) · Blue Stalfos
Bosses
Gohma · Kalle Demos · Gohdan · Helmaroc King · Jalhalla · Molgera · Puppet Ganon ![]() · Ganondorf
· Ganondorf
Minibosses
Green Bokoblin · Moblin · Mothula · Darknut · Cyclos · Phantom Ganon · Stalfos · Wizzrobe · Mighty Darknut · Big Octo![]()
Bosses
Phantom Ganon ![]() · Stone Arrghus · Helmaroc King · Big Poe · Big Moldorm x2 · Frostare · Vaati · Ganon
· Stone Arrghus · Helmaroc King · Big Poe · Big Moldorm x2 · Frostare · Vaati · Ganon
Sub-Bosses
Chief Soldier · Shadow Link ![]() · Manhandla · Dodongos · Big Dark Stalfos · Gohma · Big Dodongo
· Manhandla · Dodongos · Big Dark Stalfos · Gohma · Big Dodongo
Bosses
Big Green Chuchu ![]() · Gleerok · Mazaal · Big Octorok
· Gleerok · Mazaal · Big Octorok ![]() · Gyorg Pair · Vaati
· Gyorg Pair · Vaati ![]()
Sub-Bosses
Madderpillar ![]() · Dark Nut · Big Blue Chuchu
· Dark Nut · Big Blue Chuchu ![]() · Red Dark Nut · Black Knight
· Red Dark Nut · Black Knight
Bosses
Diababa · Fyrus · Morpheel · Stallord · Blizzeta · Armogohma · Argorok · Zant · Puppet Zelda · Ganon · Ganondorf ![]()
Sub-Bosses
Ook · King Bulblin · Dangoro · Twilit Carrier Kargarok · Twilit Bloat · Deku Toad · Death Sword · Darkhammer · Darknut · Aeralfos · Phantom Zant
Bosses
Stagnox · Fraaz · Phytops · Cragma · Byrne · Skeldritch · Demon Train · Chancellor Cole · Malladus
Stagnox II · Fraaz II · Phytops II · Cragma II · Skeldritch II · Dark Link![]()
Sub-Bosses
Mothula · Geozard · Rocktite · Ice Keese · Freezard · White Wolfos · Geozard Chief · Big Blin ![]() · Snapper · Helmet Chuchu · Metal Chuchu · Stalfos · Heatoise · Stalfos Warrior · Gerune · Ergtorok ·
· Snapper · Helmet Chuchu · Metal Chuchu · Stalfos · Heatoise · Stalfos Warrior · Gerune · Ergtorok ·
Bosses
Ghirahim ![]() · Scaldera · Moldarach · The Imprisoned
· Scaldera · Moldarach · The Imprisoned ![]() · Koloktos · Tentalus · Levias
· Koloktos · Tentalus · Levias ![]() · Bilocyte
· Bilocyte ![]() · Demise
· Demise
Sub-Bosses
Stalfos · Lizalfos · Stalmaster · Moldarach · LD-002G Scervo · Dark Lizalfos · Magmanos · Moldorm · Dreadfuse
Bosses
Yuga ![]() · Moldorm · Margomill · Gemesaur King · Arrghus · Knucklemaster · Stalblind · Zaganaga · Dharkstare · Grinexx · Yuga Ganon
· Moldorm · Margomill · Gemesaur King · Arrghus · Knucklemaster · Stalblind · Zaganaga · Dharkstare · Grinexx · Yuga Ganon
Sub-Bosses
Armos · Red Stalfos · Heedles · Green & Red Goriyas · Gigabari · Gibdos & Purple Mini-Moldorms · Red Eyegores · Flying Tiles & Devalants · Big Pengator & Pengators · Fire Gimos · Moldorm · Lorule Ball and Chain Soldier · Arrghus
StreetPass Bosses
Bosses
Margoma · Arrghus · Moldorm · Blizzagia · The Lady's Pets ![]() · Stalchampion · Prismantus · The Lady
· Stalchampion · Prismantus · The Lady
Shadow Link x3![]()
Mini-Bosses
Electric Blob King · Electric Blob Queen · Hinox Brothers · Freezlord · Vulture Vizier · Grim Repoe · Gigaleon
Bosses
Windblight Ganon · Fireblight Ganon · Master Kohga · Thunderblight Ganon · Waterblight Ganon · Calamity Ganon · Dark Beast Ganon ![]()
Sub-Bosses
Stone Talus · Igneo Talus · Frost Talus · Molduga · Hinox · Blue Hinox · Black Hinox · Stalnox · Igneo Talus Titan · Molduking
Bosses
Colgera · Mucktorok · Marbled Gohma · Queen Gibdo · Phantom Ganon · Seized Construct · The Demon King's Army · Demon King Ganondorf · Demon Dragon ![]()
Sub-Bosses
Flame Gleeok · Frost Gleeok · Sludge Like · Thunder Gleeok · King Gleeok · Yunobo · Frox · Flux Construct · Moragia · Molduga · Hinox · Stalnox · Frost Talus · Igneo Talus · Stone Talus · Battle Talus · Stone Talus (Luminous) · Ganondorf · Master Kohga · Phantom Ganon
Template:AquaticEnemy
| ||||||||||||||